replace your brakes
Well after a minor incident, I needed to replace the discs, pads and ball joints. I ordered the parts from my favorite supplies, 7 Enterprises. I will cover the ball joints in another tutorial. Here is my writeup and my experiences.
Note: It goes without saying but I'm going to say it anyway: Please proceed at your own risk. This tutorial is just for reference and may not include all the steps required. I am not responsible if you injure yourself or damage your car.
Note: It goes without saying but I'm going to say it anyway: Please proceed at your own risk. This tutorial is just for reference and may not include all the steps required. I am not responsible if you injure yourself or damage your car.
tools/parts required
- Brake Discs - I went with these drilled and slotted discs. It is very important that you get the right discs for your car. There are a couple different sizes that could be fitted to your car depending on age and options. Typical sizes are 8.4" which were the standard size fitted to all Minis manufactured after the mid-80s. The other size is 7.5" which was fitted to the Cooper S. Metros had vented discs and those are NOT a straight swap. You would need to swap your calipers and most likely your drive flanges.
- Brake Pads - I had read good reviews about the EBC Green Stuff pads so I bought them. As with the discs, make sure you get the right pads to match your calipers.
- New Cotter Pins (Optional) - You need 4 to hold the pad clips in place (2 per side) and 1 for each hub nut
- Brake Caliper Grease
- Brake Fluid - This is only necessary if you are going be topping off or changing the fluid. I have been told that Minis require DOT4 fluid but I bought some that was safe for use in DOT3 or DOT4 systems
- Clear Tube - Again, only necessary if you're going to bleed the brakes. Aquarium tubing works well.
- Torque Wrench
- 34mm or 1-5/16 socket - The hub nut can be either one of these sizes. I found this socket very difficult to find. I did not want a 3/4" drive socket so my choices were limited. I found a 34mm socket at AutoZone made by OEM
- Breaker Bar - The torque required to remove the hub nut is immense. You will need a breaker bar to help you get some extra leverage on the bolt. I found a reasonably cheap one at HF tools. Most of their tools are crap, but for $10 and a lifetime warranty, who can argue.
- Floor Jack and Jack stands or a lift
- Brake cleaner
- Penetrating Fluid - I used PB Blaster
removing the old stuff
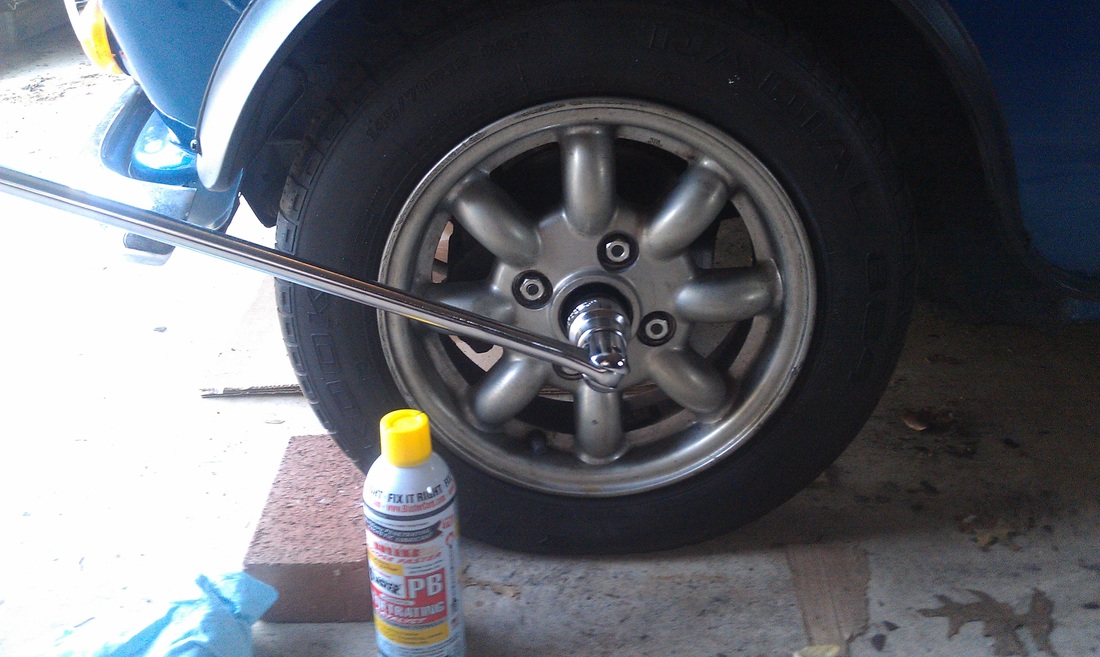
1. The first thing to do is to remove the split pin and the hub nut. This may be the most difficult part. There are a couple schools of thought on the best way to do this. Some say it may be better to remove the caliper first, but those brakes could come in handy. Because the torque required to remove the nut is so immense, you may not want to try and remove it while on stands.
The best way to do it is to remove the center cap from your wheel and loosen the nut while the wheel is still on the car. This allows you to keep the full weight of the car on the wheel and help prevent it from spinning. Make sure the handbrake is on and the car is in gear. If possible, have a friend stamp on the brakes to help. If you have already removed the wheel or the brakes can't be used, find a way to wedge a bar between the wheel studs and the ground to prevent the wheel from turning. Take great care to make sure you don't bend any of the studs. I found at few sprays of PB Blaster penetrating fluid to be immensely helpful.
This is where your breaker bar and your 34mm (or 1-5/16") socket becomes useful. If you need additional leverage, you can always try sliding a pole over your breaker bar to increase its length. Don't do what I did and waste a whole day trying to find these items.
Alternatively you can build a simple tool like (pictured below) which will prevent the wheel from spinning. Photo courtesy of minivanman on The Mini Forum

2. After loosening the hub retaining nut, jack the car up and make sure it's secure.
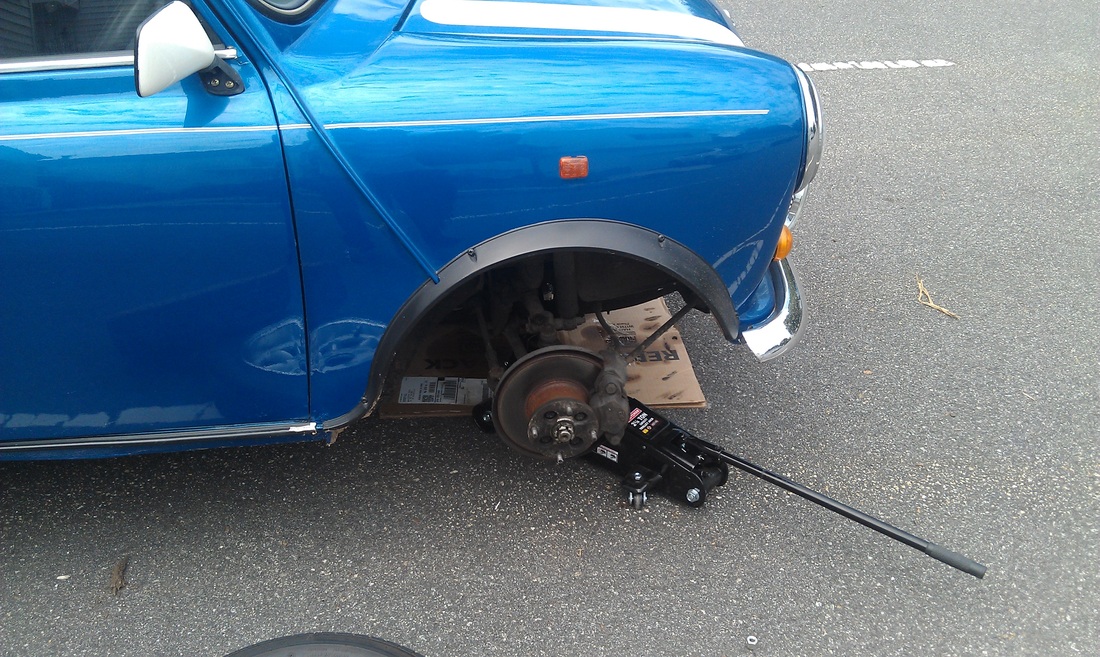
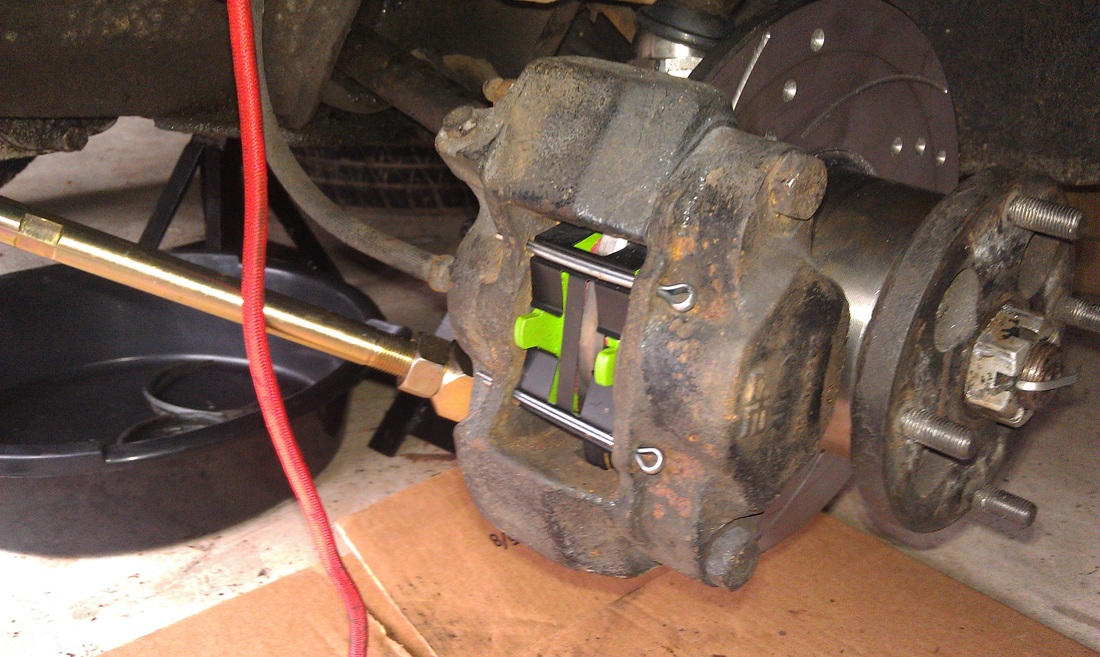
3. Next step is to remove the caliper. First, straighten the two split pins and remove them. This will allow you to remove the pad retaining plate and then the pads. Finally, removing the caliper requires the removal of the two retaining bolts on the back side. It is also useful here to use your breaker bar. After unbolting the caliper, use bungee cords to suspend the caliper from the body ensuring that the brake line isn't being stretched.

4. Remove the hub nut completely and then remove the tapered washer that it behind it. It's easier to pop out by prying out with a screw driver.
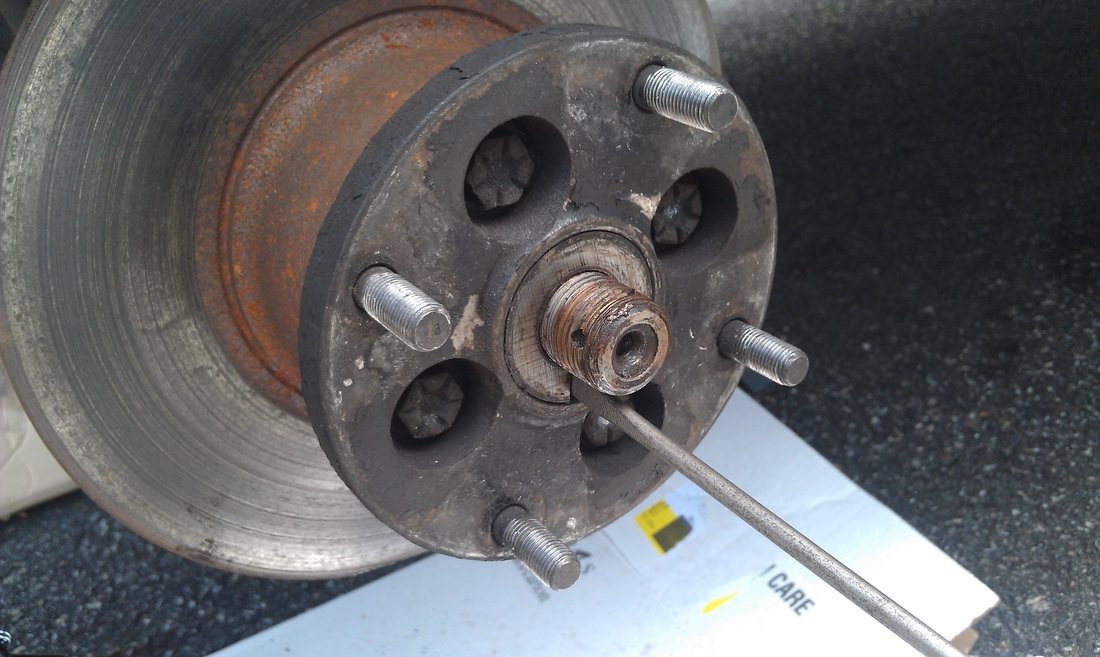
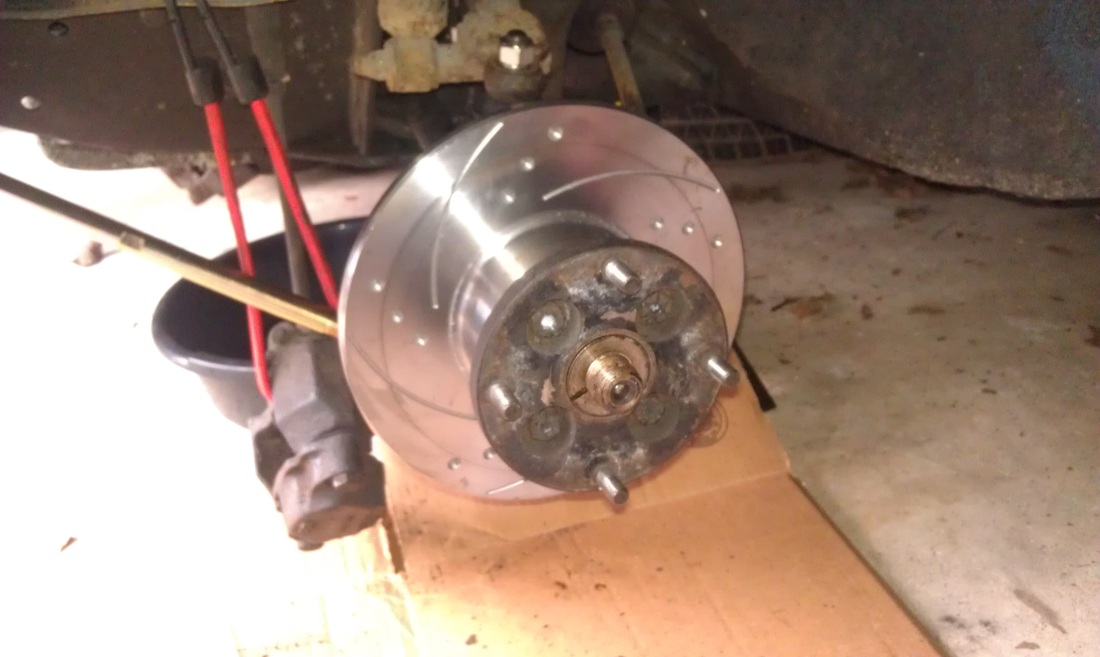
5. After the caliper is off, the drive flange and disc should slide off the spline. In order to remove the drive flange from the disc, you need a vice or a friend. I used a lug wrench and a wall. My breaker bar came in handy again.

6. Clean off any rust with a wire brush and then put the drive flange on to the new disc. Mine needed a little persuasion so I positioned a large socket in the middle of the flange and after a couple hammer hits, the two pieces seated together. Using a torque wrench, torque the bolts to 42 lb-ft. (Consult a Haynes manual to be sure in case your model is different)

I torqued up the bolts using a vice. I recommend this option
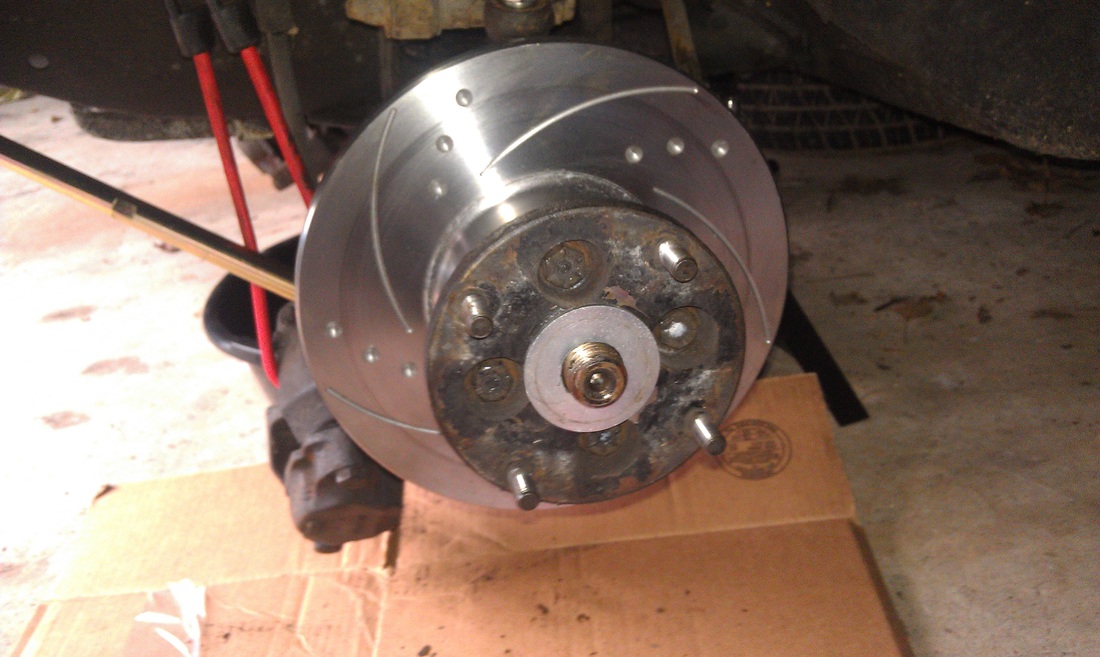
7. Return the disc and the hub back on to the car. It's now time to tighten the castle nut. It is recommended that you do this twice. The first time it should be done with a flat washer because the tapered washer could bind before the hub is fully seated. I couldn't find a washer that was large enough so I got the largest I could (3/4" inner diameter) and then used a Dremel to grind out the inside a bit.

My flat washer
8. Undo the nut and replace the flat washer with the tapered washer. Instead of putting the wheel on, I used a bar to hold the wheel steady. Just be careful not to bend the wheel studs. Again, consult a Haynes manual for the correct torque. Mine was 150 ft-lbs because it has multiple holes for the split pin. After you have reached the correct torque, tighten the nut until you can put the split pin in.
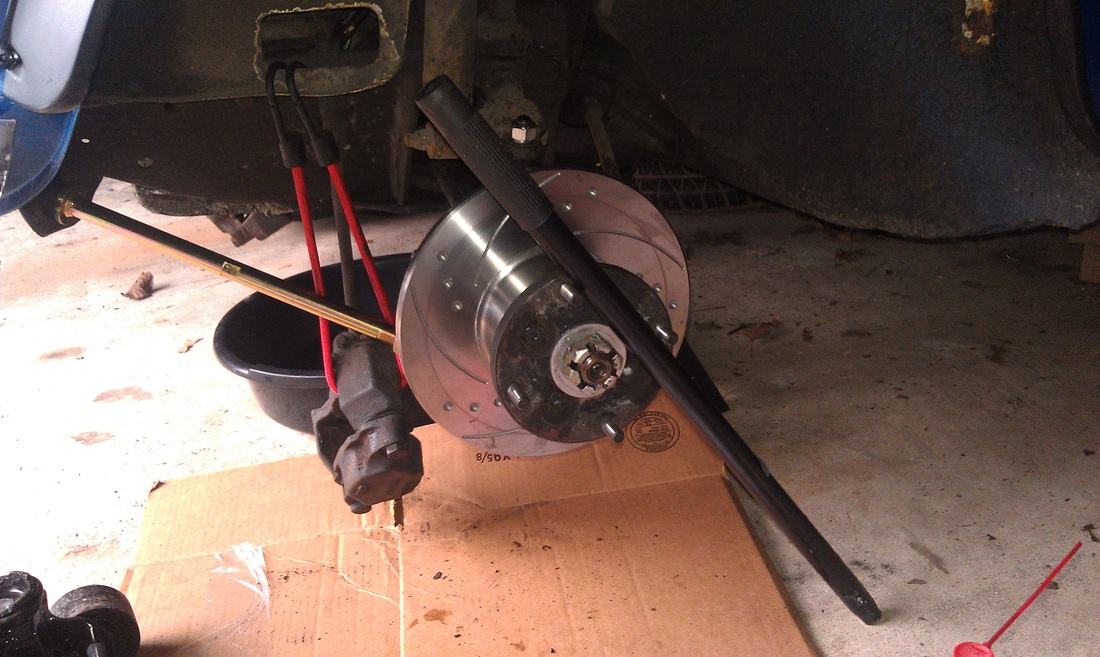
The bar I used to prevent the hub from spinning
Don't forget the tapered washer before you put on the castle nut!
9. Before you put the caliper back on the hub, you need to push the piston back into the caliper as far as it will go, otherwise your new pads won't fit. The Haynes manual suggests using a screw driver but I used a pair of channel lock pliers to squeeze the piston back into the caliper. Replace the brake caliper on the hub and insert the pads and shims. It is recommended that you put some copper grease on the back of the pads to prevent squealing. Next, replace the pad retaining clip and split pins. Lastly, make sure to secure the split pins by bending the ends.
Note: Before compressing the piston, remove the brake fluid reservoir cap and check the level. Pushing the piston back into the caliper will return fluid back to the reservoir. It is recommended that you place a rag to prevent the highly corrosive fluid from spilling into the engine bay.
Note: Before compressing the piston, remove the brake fluid reservoir cap and check the level. Pushing the piston back into the caliper will return fluid back to the reservoir. It is recommended that you place a rag to prevent the highly corrosive fluid from spilling into the engine bay.
10. Put the wheel back on the car and spin it to make sure nothing is binding. It is important to remember that the first couple times you push the brake pedal it is going to travel to the floor until the pistons return to the proper position against the pads. You should also be careful during the "bed-in" period for the pads. Emergency stops should be avoided.
This is an original tutorial from http://classicmini.weebly.com
